Parent to Child Communication in LWC with Practical Examples
Parent to Child Communication is one of the most important concepts in LWC. In real Salesforce project, we often build reusable component where a parent component controls logic, and a child component displays data or perform specific action. This is where Parent to Child Communication in LWC becomes essential.
In this guide you will learn:
- Why we use parent-to-child communication
- How
@apiworks - Passing String data
- Passing Object data
- Invoking child methods
Why We Need Parent to Child Communication in LWC?
- We want reusable child components where we break UI into smaller reusable components.
- We need controlled one-way data flow
- We want separation of concerns where we divide the responsibility into different sections.
- We need dynamic UI updates
- We follow component-based architecture best practices.
How Parent to Child Communication in LWC Works?
It works using @api decorator. This decorator is used to expose properties or methods in JavaScript class. It makes them public and accessible to other components in containment hierarchy.
- Parent passes data via attributes.
- Child exposes public properties or methods using
@api
Examples of Parent to Child Communication in LWC
Passing String Data
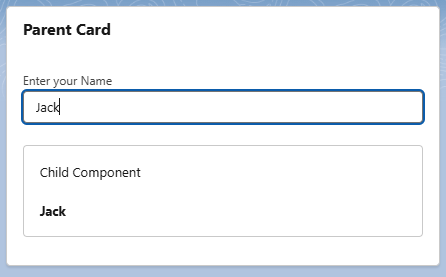
In the below example, we are passing data entered by end user in parent component to child component and displaying it on UI.
- When user types something in input field.
onchangeevent gets triggered which will runonChangeHandler - In event handler, we are assigning entered value to
messageproperty. - Then, we are passing entered message to child component
message={message}. Left side is child’s public property and right one is parent’s property. - Please note, we use kebab case (lowercase letters seperated by hyphens) to reference child component as well as child properties in parent component. For example, if your child component name is
childComponentand it is having property asaccountData. Then you will refer it as<c-child-component account-data={accountData}>
Parent Component
<template>
    <lightning-card title="Parent Card">
        <div class="slds-p-around_medium">
            <lightning-input
                    label="Enter your Name"
                    onchange={onChangeHandler}
            ></lightning-input>
            </br>
            <div class="slds-box">
                <h3>Child Component</h3>
                </br>
                <c-child-component-string-example message={message}></c-child-component-string-example>
            </div>
        </div>
    </lightning-card>
</template>
import { LightningElement } from 'lwc';
export default class ParentComponentStringExample extends LightningElement {
    message;
    onChangeHandler(event){
        this.message = event.target.value;
    }
}
Child Component
<template>
    <p><b>{message}</b></p>
</template>
import { LightningElement,api } from 'lwc';
export default class ChildComponentStringExample extends LightningElement {
    @api message;
}
Output
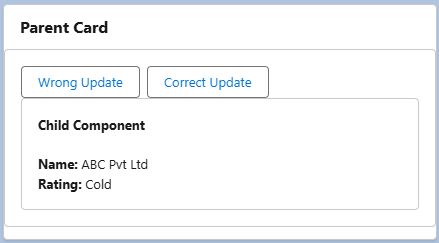
Passing Object Data
In this example, we are trying to simulate a real-world scenario, where we are passing object data from parent to child.
- We have added two buttons in parent component which will update the properties of
accountInfoobject. - When we click on Wrong Update button, we are modifying the
Ratingproperty ofaccountInfoobject. Object property changes but the object reference remains the same. Therefore, child component does not re-render. - By default, LWC framework do not observe internal property mutation of an object. It only observes object reference. Hence, when we click Wrong Update button child component does not re-render.
- To tell framework to observe the changes of properties of object we need to decorate property with
@trackdecorator. - On the Other hand, when we click Correct Update button, we are actually creating a new object which will change the reference of an object. therefore, Child re-renders automatically. This is a preferred way to pass updated data to child component.
Parent Component
<template>
<lightning-card title="Parent Card">
<div class="slds-p-around_medium slds-box">
<lightning-button label="Wrong Update"
onclick={updateRatingWrong}>
</lightning-button>
<lightning-button label="Correct Update"
onclick={updateRatingCorrect}>
</lightning-button>
<div class="slds-box">
<h3><b>Child Component</b></h3>
</br>
<c-child-component-object-example account-data={accountInfo}></c-child-component-object-example>
</div>
</div>
</lightning-card>
</template>
import { LightningElement } from 'lwc';
export default class ParentComponentObjectExample extends LightningElement {
    accountInfo = {
        Name: 'ABC Pvt Ltd',
        Rating: 'Hot'
    };

    updateRatingWrong() {
        this.accountInfo.Rating = 'Cold'; //Wrong way
    }

    updateRatingCorrect() {
        this.accountInfo = {
            ...this.accountInfo,
            Rating: 'Cold'
        }; //Correct Way
    }
}
Child Component
<template>
    <p><b>Name: </b>{accountData.Name}</p>
    <p><b>Rating: </b>{accountData.Rating}</p>
</template>
import { LightningElement,api } from 'lwc';
export default class ChildComponentObjectExample extends LightningElement {
    @api accountData;
}
Output
Calling Child Method from Parent in LWC
Sometimes in Parent to Child Communication in LWC, instead of passing only data, we can expose a public method in the child using @api and call it from parent. In the below example, child component contains a form, and parent has a Reset Form button. When user clicks reset in parent child form should clear.
- In child component
namestores input value. handleChange()updates it, andresetForm()is marked as@apiwhich makes it public.- Parent finds child component using
querySelector. Make sure to not query child component withinconnectedCallbacklifecycle hook. - Parent calls
resetForm()method to clear the input field.
Parent Component
<template>
    <lightning-card title="Parent Card">
        <div class="slds-p-around_medium slds-box">
            <lightning-button
                label="Reset Form"
                onclick={handleReset}>
            </lightning-button>
            <div class="slds-box">
                <c-child-component></c-child-component>
            </div>
        </div>
    </lightning-card>
</template>
import { LightningElement } from 'lwc';
export default class ParentComponent extends LightningElement {
    handleReset() {
        const childComp = this.template.querySelector('c-child-component');
        if (childComp) {
            childComp.resetForm();
        }
    }
}
Child Component
<template>
    <lightning-input
        label="Enter Name"
        value={name}
        onchange={handleChange}>
    </lightning-input>
    </br>
    <p><b>{name}</b></p>
</template>
import { LightningElement,api } from 'lwc';
export default class ChildComponent extends LightningElement {
    name = '';
    handleChange(event) {
        this.name = event.target.value;
    }
    @api
    resetForm() {
        this.name = '';
    }
}
Parent to Child Communication in LWC is the foundation of scalable component architecture in Salesforce development. Once you master
- Passing primitive values
- Passing object data
- Invoking child methods
- Handling reactivity
You’ll be confident in real-world Lightning Web Components projects and interviews.
